
Azure Service Bus is a fully managed enterprise message broker with message queues and publish-subscribe topics. It offers a pull model for receiving messages, which means that the consumer must explicitly request messages from the broker.
You can find more information about Azure Service Bus on Microsoft learn: Azure Service Bus
Youtube video explaining Azure Service Bus: Azure Message Queues
You can find a code example for .NET in my github repository: Azure Service Bus .NET Example
Why Messaging Solutions?
- Asynchronous communication
Messaging solutions enable asynchronous operations, allowing systems to faciliate long running processes, e.g. the sending of an email to the message broker, which keeps the system responsive.
- Decoupling of services
If the consumer is temporarily unavailable, the producer can continue to send messages to the broker without being affected. Another aspect is technical decoupling – the producer doesn’t have to know the implementation details of the consumer, e.g. programming language, platform, etc. The message broker acts as a contract between the two services.
- Scalability
If the amount of messages increases, the messaging solution can be scaled independently of the producer and consumer services. This is mostly done by outscaling the message broker (adding more servers).
- Reliability
The message can be persisted in the message broker until it is successfully processed by the consumer. In case of failures, messages can be retried or dead-lettered for further inspection.
- Load leveling
The mesage broker can act as a buffer between the producer and consumer, smoothing out spikes in message volume and preventing the consumer from being overwhelmed.
- Microservices communication
A common use case for messaging solutions is in microservices architectures, where services need to communicate with each other in a decoupled and scalable manner.
What is the difference between a message broker and an event broker like Azure Event Grid/Azure Event Hub?
A message broker like Azure Service Bus focuses on reliable delivery of messages between producers and consumers, often with features like message ordering, duplicate detection, and transactions. An event broker like Azure Event Grid or Azure Event Hub is designed for high-throughput event streaming and event-driven architectures, where events are published and consumed in a more loosely coupled manner, often without strict delivery guarantees.
A typical use case for a message broker is order processing in an e-commerce application, where each order must be reliably processed by a specific service. A typical use case for an event broker is telemetry data collection from IoT devices, where events are generated at a high rate and consumed by multiple services for analysis and processing.
A message broker is better suited for commands („do this action“) while an event broker is better suited for events („this action happened“).
Compare Azure Service Bus and Azure Queue Storage
Azure offers two main messaging services: Azure Service Bus and Azure Queue Storage. There are clear differences between the two services.
When to use Azure Service Bus Service
- Your solution needs strict ordering of messages (FIFO)
- Your solution needs duplicate detection
- You want your application to process parallel long running streams of messages
- You need advanced features like dead-lettering (store messages which could not be sent) or scheduled delivery
- Your solution requires transactional behavior and atomicity when sending or receiving multiple messages from a queue.
- You deal with a requirement to provide a role-based access model to the queues, and different rights/permissions for senders and receivers.
When to use Azure Queue Storage
- Your solution requires simple, cost-effective message queuing for basic scenarios.
- You need to store large volumes of messages (more than 80 GB)
- You require server side logs of all operations performed on the queue
Protocol and message structure
Azure service bus uses the AMQP protocol (Advanced Messaging Queueing Protocol) for communication, which is a binary protocol optimized for high performance and low latency. The messages consist of metadata and an optional payload. The metadata contains systems properties (e.g. message ID, correlation ID, time to live) and custom properties (key-value pairs defined by the user).
The system properties are used by the service bus for routing and processing the messages, while the custom properties can be used by the application for additional context. The payload is binary data and is ignored by the service bus.
The following table shows the existing system properties of a Service Bus message:
| Property | Type | Description |
|---|---|---|
| MessageId | string | Unique message ID (used for Duplicate Detection) |
| SequenceNumber | long | Running number of the message in the queue/subscription |
| EnqueuedTime | DateTimeOffset | Timestamp when the message was enqueued |
| ExpiresAt / TimeToLive | DateTimeOffset | Expiration time of the message |
| ContentType | string | MIME type of the message (e.g., application/json) |
| CorrelationId | string | Used for correlating messages (e.g., request/response) |
| Label | string | Optional label or message type |
| ReplyTo | string | Address for responses (request/response pattern) |
| ReplyToSessionId | string | SessionId for reply-to messages (session-based workflows) |
| To | string | Logical destination (informational only, no routing effect) |
| ScheduledEnqueueTime | DateTimeOffset | Time when the message should become available |
| PartitionKey | string | Used for partitioned queues/topics to determine the partition |
| SessionId | string | Assigned SessionId for session-enabled processing |
| State | byte[] | Session state (only relevant for session messages) |
| LockedUntil | DateTimeOffset | Time until which the message is locked (Peek-Lock) |
| LockToken | string | Token used to Complete/Abandon/Defer/DeadLetter the message |
| DeadLetterSource | string | If the message comes from a DLQ, the name of the original queue/subscription |
Payload serialization
Service Bus treats message payloads as opaque binary blocks and does not interpret their contents. The ContentType property should be used to indicate the serialization format, typically using a MIME type such as application/json;charset=utf-8.
While the Service Bus SDK supports automatic object serialization (legacy binary serialization or AMQP object graphs), this approach is protocol- and SDK-specific. For maximum interoperability, applications should explicitly serialize objects into a byte stream and deserialize them on the receiving side.
A common approach is to version the payload schema or message contract (for example using semantic versioning) to handle changes in the object structure over time. The schemas can be mangaged in a separate schema registry or repository.
Namespace, Queues and Topics
The parent element of Azure Service Bus is the namespace, which is a container for all messaging components. Within a namespace, you can create multiple queues and topics. A common pattern is to have a seperate namespace for each environment (development, staging, production) of an application to isolate resources and manage access control.
Inside a namespace, you can create multiple queues and topics. A queue is a simple first-in-first-out (FIFO) data structure that stores messages until they are processed by a consumer. The relationship between the producer and the consumer of a queue is 1-to-1.
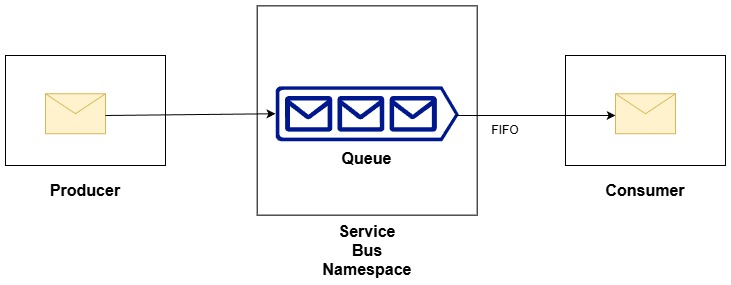
Image1: A Service Bus Queue
Creating a Service Bus Queue using Azure CLI :
az servicebus queue create \
  --resource-group <RESOURCE_GROUP> \
  --namespace-name <SERVICEBUS_NAMESPACE> \
  --name <QUEUE_NAME>
A topic is a more advanced messaging pattern that allows multiple subscribers to receive messages from a single publisher.
The relationship between the producer and the consumer of a topic is 1-to-many. You can think of a subscription as a virtual queue that receives messages from the topic based on filters defined by the subscriber.
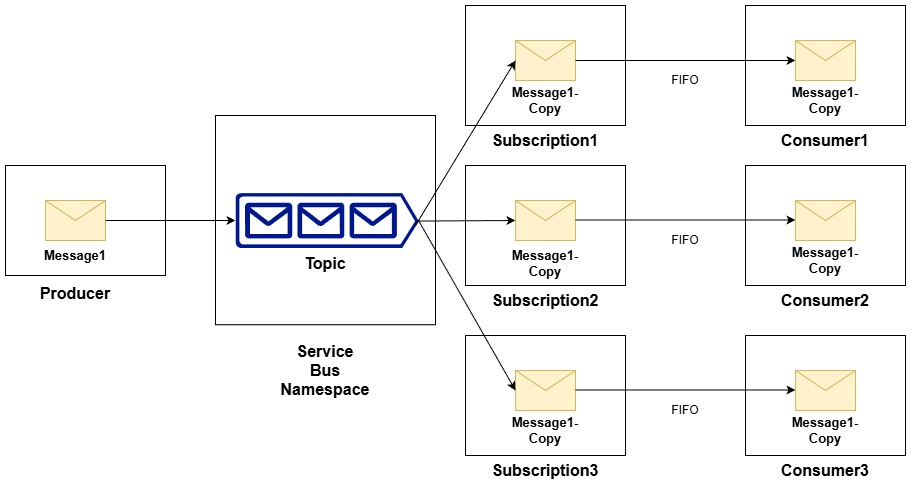
Image2: A Service Bus Topic
Creating a Service Bus Topic using Azure CLI :
az servicebus topic create \
--resource-group \
--namespace-name \
--name
When creating a subscription, you can define rules and filters to control which messages are delivered to the subscription. The filters operate on the message properties (system and custom) and can be used to implement complex routing scenarios.
You can find more information on actions and filters here: Service Bus Subscription Filters and Actions
Creating a Service Bus Topic Subscription without filter using Azure CLI :
az servicebus topic subscription create \
--resource-group \
--namespace-name \
--topic-name \
--name
Creating a Service Bus Topic Subscription with SQL filter and correlation-id filter using Azure CLI :
az servicebus topic subscription create \
--resource-group myRG \
--namespace-name myNamespace \
--topic-name myTopic \
--name mySubSql \
--sql-expression "sys.Label = 'order-created'" \
--correlation-id order-123
Creating a Service Bus Topic Subscription Rule with SQL filter and action using Azure CLI :
az servicebus topic subscription rule create \
--resource-group myRG \
--namespace-name myNamespace \
--topic-name myTopic \
--subscription-name mySub \
--name EnrichMessage \
--filter-sql-expression "amount > 100" \
--action-sql-expression "SET priority = 'high'"
Receive Modes
Azure Service Bus supports two receive modes: PeekLock and ReceiveAndDelete.
The PeekLock mode is the default mode and is used to ensure that messages are processed at least once. When a message is received in PeekLock mode, it is locked for a specified period (lock duration) and is not removed from the queue or topic subscription. The consumer must explicitly complete the message to remove it from the queue. If the message is not completed within the lock duration, it becomes available for processing again.
Receiving a message in PeekLock mode using C# SDK :
await using var client = new ServiceBusClient(connectionString);
ServiceBusProcessor processor = client.CreateProcessor(topicName, subscriptionName);

processor.ProcessMessageAsync += async args =>
{
     string body = args.Message.Body.ToString();
     Console.WriteLine($"Peek-Lock received: {body}");

     // Completing the message removes it from the queue
     await args.CompleteMessageAsync(args.Message);

     // If processing fails, you can abandon the message to make it available again
     //await args.AbandonMessageAsync(args.Message);
};
The ReceiveAndDelete mode is used for scenarios where message loss is acceptable, it ensures that the message is processed at most once. When a message is received in ReceiveAndDelete mode, it is immediately removed from the queue or topic subscription. If the consumer fails to process the message, it is lost and cannot be recovered.
Note that the ServiceBusProcessor does not support ReceiveAndDelete mode. You need to use the ServiceBusReceiver to receive messages in this mode.
Receiving a message in ReceiveAndDelete mode using C# SDK :
await using var client = new ServiceBusClient(connectionString);
ServiceBusReceiver receiver = client.CreateReceiver(queueName, new ServiceBusReceiverOptions
{
     ReceiveMode = ServiceBusReceiveMode.ReceiveAndDelete
});

ServiceBusReceivedMessage message = await receiver.ReceiveMessageAsync();
string body = message.Body.ToString();
Console.WriteLine($"Receive and Delete received: {body}");
Message Routing
A subset of the system properties, specifically To, ReplyTo, ReplyToSessionId, MessageId, CorrelationId, and SessionId, help applications route messages to particular destinations. The following patterns describe the routing:
Simple Request/Reply Pattern
In a request/reply pattern, the producer sends a request message to a queue or topic and expects a reply message from the consumer. The reply message is sent to a separate queue or topic specified in the ReplyTo property of the request message. The consumer processes the request message and sends the reply message to the specified destination.
The consumer can use the CorrelationId property to correlate the reply message with the original request message by setting the CorrelationId of the reply message to the MessageId of the request message.
Multicast Request/Reply Pattern
As a variation of the prior pattern, a publisher sends the message into a topic and multiple subscribers become eligible to consume the message. Each of the subscribers might respond in the fashion described previously. If ReplyTo points to a topic, such a set of discovery responses can be distributed to an audience.
Multiplexing Pattern
In this pattern the session ID is used to route messages to specific consumers. The producer sets the SessionId property of the message to a unique value that identifies the consumer. The consumer creates a session receiver that listens for messages with the specified session ID and locks the session for exclusive processing.
Also see the Sessions section for more information.
Multiplexed request/reply
This session feature enables multiplexed replies, allowing several publishers to share a reply queue. By setting ReplyToSessionId, the publisher can instruct one or more consumers to copy that value into the SessionId property of the reply message. The publishing queue or topic doesn’t need to be session-aware. When the message is sent the publisher can wait for a session with the given SessionId to materialize on the queue by conditionally accepting a session receiver.
Advanced Features
Dead-lettering
Azure Service Bus supports dead-lettering, which allows messages that cannot be delivered or processed to be moved to a separate dead-letter queue (DLQ). The DLQ is automatically created in Azure Service Bus for each queue and topic subscription and can be used to inspect and troubleshoot failed messages.The default reasons for dead-lettering are:
- Message size exceeded
- Max delivery count exceeded (default is 10)
- Time to live (TTL) expired (default depends on the tier. 14 days for Basic and Standard tier. Infinite only for Premium tier)
- Filter evaluation failed (for topic subscriptions
- Explicit dead-lettering by the consumer
Creating a Service Bus Queue with dead-lettering using Azure CLI with TTL = 7 days :
bash
az servicebus queue create \
--resource-group myRG \
--namespace-name myNamespace \
--name myQueue \
--max-delivery-count 8 \
--dead-lettering-on-message-expiration true \
--default-message-time-to-live P7D
Scheduled Delivery
Azure Service Bus allows messages to be scheduled for future delivery. When a message is scheduled, it is stored in the queue or topic subscription until the specified delivery time is reached. This feature can be used to implement delayed processing scenarios, such as sending reminders or notifications at a later time.
The delayed delivery time is specified using the ScheduledEnqueueTimeUtc property and can set by the producer when sending the message.
Scheduling a message for future delivery using C# SDK :
csharp
var client = new ServiceBusClient(connectionString);
var sender = client.CreateSender("myQueue");

var message = new ServiceBusMessage("{\"orderId\":123}")
{
ScheduledEnqueueTime = DateTimeOffset.UtcNow.AddMinutes(5)
};

await sender.SendMessageAsync(message);
Transactions
Azure Service Bus supports transactions, which allow multiple operations to be grouped together and executed atomically. This means that either all operations succeed, or none of them do. Transactions can be used to ensure consistency when sending or receiving multiple messages from a queue or topic subscription.
Using transactions to send multiple messages atomically using C# SDK :
// Create client
await using var client = new ServiceBusClient(connectionString);
ServiceBusSender sender = client.CreateSender(topicName);

// Create a transaction scope
using var ts = await client.CreateTransactionAsync();

try
{
    for (int i = 1; i <= 5; i++)
    {
       ServiceBusMessage message = new ServiceBusMessage($"Message {i}");
       // send message within the transaction
       await sender.SendMessageAsync(message, new ServiceBusSendOptions { Transaction = ts });
       Console.WriteLine($"Queued (transactional): Message {i}");
    }

    // commit the transaction → this will send all messages
    await ts.CommitAsync();
    Console.WriteLine("Transaction committed: All messages sent successfully.");
}
catch (Exception ex)
{
    // rollback in case of an error → no messages will be sent
    await ts.RollbackAsync();
    Console.WriteLine($"Transaction rolled back due to error: {ex.Message}");
}
Sessions
Azure Service Bus supports sessions, which allow messages to be grouped together based on a common session ID. This feature can be used to implement ordered processing of related messages, such as processing all messages for a specific customer or order in sequence.
A typical use case for sessions is to ensure that all messages related to a specific workflow or transaction are processed in the correct order, even if they are sent by different producers.
Sessions are enabled by setting the RequiredSession property to true when creating a queue or topic subscription.
Creating a Service Bus Queue with sessions using Azure CLI :
az servicebus queue create \
--resource-group myRG \
--namespace-name myNamespace \
--name mySessionQueue \
--requires-session true
Creating a Service Bus Topic Subscription with sessions using Azure CLI :
az servicebus topic subscription create \
--resource-group myRG \
--namespace-name myNamespace \
--topic-name myTopic \
--name mySessionSub \
--requires-session true
Follwing code example shows how to send and receive messages using sessions. Notice that the SessionId property is set when sending messages.
Sending alternating messages with two different session IDs using C# SDK :
await using var client = new ServiceBusClient(connectionString);
ServiceBusSender sender = client.CreateSender(topicName);

// simulate 2 sessions
string[] sessionIds = { "Order-1", "Order-2" };

for (int i = 1; i <= 6; i++)
{
    string sessionId = sessionIds[i % 2]; // Alternate between sessions
    var message = new ServiceBusMessage($"Message {i} for {sessionId}")
    {
        SessionId = sessionId
    };

    await sender.SendMessageAsync(message);
    Console.WriteLine($"Sent: {message.Body} (Session: {sessionId})");
}
Receiving messages from sessions using C# SDK :
await using var client = new ServiceBusClient(connectionString);

var processorOptions = new ServiceBusSessionProcessorOptions
{
    MaxConcurrentSessions = 1, // Process one session at a time
    MaxConcurrentCallsPerSession = 1 // Process one message at a time per session
};

ServiceBusSessionProcessor processor =
    client.CreateSessionProcessor(topicName, subscriptionName, processorOptions);

processor.ProcessMessageAsync += async args =>
{
    string body = args.Message.Body.ToString();
    string sessionId = args.SessionId;

    Console.WriteLine(
        $"[{DateTime.Now:HH:mm:ss}] " +
        $"Consumer1 " +
        $"Session {sessionId} {body}");

    await Task.Delay(1000);
    await args.CompleteMessageAsync(args.Message);
};

processor.ProcessErrorAsync += args =>
{
    Console.WriteLine($"Error: {args.Exception.Message}");
    return Task.CompletedTask;
};

await processor.StartProcessingAsync();
Console.WriteLine("Consumer2 running. Press ENTER to stop.");
Console.ReadLine();

await processor.StopProcessingAsync();
The code will produce the following output for the producer:
Sent: Message 1 for Order-2 (Session: Order-2)
Sent: Message 2 for Order-1 (Session: Order-1)
Sent: Message 3 for Order-2 (Session: Order-2)
Sent: Message 4 for Order-1 (Session: Order-1)
Sent: Message 5 for Order-2 (Session: Order-2)
Sent: Message 6 for Order-1 (Session: Order-1)
And the following output for the consumer:
[12:00:01] Consumer1 Session Order-2 Message 1 for Order-2
[12:00:02] Consumer1 Session Order-2 Message 3 for Order-2
[12:00:03] Consumer1 Session Order-2 Message 5 for Order-2
[12:00:04] Consumer1 Session Order-1 Message 2 for Order-1
[12:00:05] Consumer1 Session Order-1 Message 4 for Order-1
[12:00:06] Consumer1 Session Order-1 Message 6 for Order-1
Notice that all messages for „Order-2“ are processed before any messages for „Order-1“, demonstrating ordered processing within sessions.
How does the consumer know when all messages for a session have been processed?
The session remains active until it is explicitly closed or the session times out based on the SessionIdleTimeout setting. For more possible strategies to close a session, refer to the official documentation: Session Management in Azure Service Bus.
Duplicate Detection
Azure Service Bus supports duplicate detection, which allows the broker to automatically identify and discard duplicate messages based on a unique message ID. This feature can be used to ensure that messages are processed only once, even if they are sent multiple times by the producer.
To enable duplicate detection, set the RequiresDuplicateDetection property to true when creating a queue or topic. You can also specify a time window (in seconds) during which duplicate messages will be detected using the DuplicateDetectionHistoryTimeWindow property.
Creating a Service Bus Queue with duplicate detection using Azure CLI :
az servicebus queue create \
--resource-group myRG \
--namespace-name myNamespace \
--name myDupQueue \
--requires-duplicate-detection true \
--duplicate-detection-history-time-window PT10M
To make Duplicate detection work, the producer must set a unique MessageId property when sending messages. Without this property, the Service Bus cannot identify duplicate messages.
var message = new ServiceBusMessage("Hello World")
{
    MessageId = "order-4711"
};

await sender.SendMessageAsync(message);
Autoforwarding
Azure Service Bus supports autoforwarding, which allows messages to be automatically forwarded from one queue or topic subscription to another. This feature can be used to implement complex routing scenarios, such as forwarding messages to different queues based on their content or properties.
To enable autoforwarding, set the ForwardTo property when creating a queue or topic subscription.The destination queue or topic must exist in the same namespace.
Creating a Service Bus Queue with autoforwarding using Azure CLI :
az servicebus queue create \
--resource-group myRG \
--namespace-name myNamespace \
--name mySourceQueue \
--forward-to myDestinationQueue
Creating a Service Bus Topic Subscription with autoforwarding using Azure CLI :
az servicebus topic subscription create \
--resource-group myRG \
--namespace-name myNamespace \
--topic-name myTopic \
--name mySourceSub \
--forward-to myDestinationQueue
Schreibe einen Kommentar